Standardized work is how you combine labor, materials, and equipment to produce in the safest, highest-quality, and most efficient way. Toyota insiders describe it as “our secret weapon”... that should tell you a lot!
In standardized work, activity repeats in a cycle. Ideally, one cycle results in one product.
Non-cyclical activities (e.g. material handling, maintenance) benefit from standard work.
Engineering standards describe the what (e.g., specifications, routing). Standardized work describes the how, and the standards are created by those who do the work.
With standardized work, you will be able to rapidly attain consistent volumes and quality even with new operators.
Having a single description of how the work is actually done is always the starting point for any improvement or problem-solving activity. That is why it’s imperative that you keep your standard work documents up-to-date.
There are three types of standardized work, and each fits different situations best. Type one and type two typically fit better in manufacturing environments, and type three is best for distribution or warehousing operations. Reference the table below to see which type of standardized work is best for your business.
| Type I | Type II | Type III | |
| Criteria |
|
|
|
| Work area |
|
|
Production support:
|
| Goal | Cycle time = takt time | Weighted average cycle time = takt time | Full utilization of labor |
Do a Pareto Chart of your products (by units, not dollar value) to identify your high-runners and start with those. You can’t create standardized work without observing the product actually being made, so if your highest runner isn’t in production right now, go down the list until you find one that is.
Involve your operators to get the best results. Explain that you’ll use their input to define the best way to do the work, and that standards always evolve.
Get the time observation sheet from the toolkit section at the top of this page, find a stopwatch with lap memory, and identify who you will time and when you will time them. Begin observing the work cycle to understand it in depth.
It’s almost guaranteed you’ll see the work done differently by different people. So, who has the best method? It might be a mix from different people. Work with your operators and figure out one way of doing the work that will become the standard for everyone. This isn’t necessarily the fastest one: you must put safety and quality first.
These should be chunks of work that form a whole and could conceivably be transferred to another person. Define a clear breakpoint that identifies when each work element starts. You’ll use them when you do the time studies: they are basically triggers for you to press the lap button on your stopwatch, so try to pick breakpoints that have a consistent “warning” shortly before they occur so that you’re primed to press the button. This could be a noise, a movement, a light, etc.
Train operators on the sequence of work elements. Let them practice the work until they have memorized the sequence. During this time, observe with stopwatch in hand, but not taking any times. This gets them used to your presence and it allows you to correct any mistakes they make. Give immediate feedback when you observe a deviation and remind them that it’s normal to make mistakes when you’re learning something. Explain that standard work is done with operators and is a starting point, not an end point.
Using a pencil and your observation sheet, time ten full cycles of the work you are observing. Just write the lap number in each cell of your worksheet. If something abnormal happens (e.g. a tool is dropped and has to be picked up), you can enter that as a lap by writing the lap number outside the form with a quick explanation, and then continue on.
Notice this reads in columns: top to bottom and left to right. When you’re using this form, what you memorize and look for are not so much the work elements, but the break points. (E) is the sum of times for each column, i.e. the cycle time. Notice that times are taken to the hundredth of a second (e.g. the first time is 57.08 seconds). For each work element on the observation sheet below, indicate the lowest (A) and highest (B) times. This gives you the fluctuation (C), which is the difference between the highest and lowest time. Subtract the sum of your lowest times (D) from the lowest observed cycle (E), which is 38.08 – 35.71= 2.37s. Then distribute that result among the green numbers to get “time-adjusted” values (F). This is your standard time.
Note that the distribution of that 2.37s to get adjusted times is purely subjective. You typically apply it where there are more unavoidable fluctuations.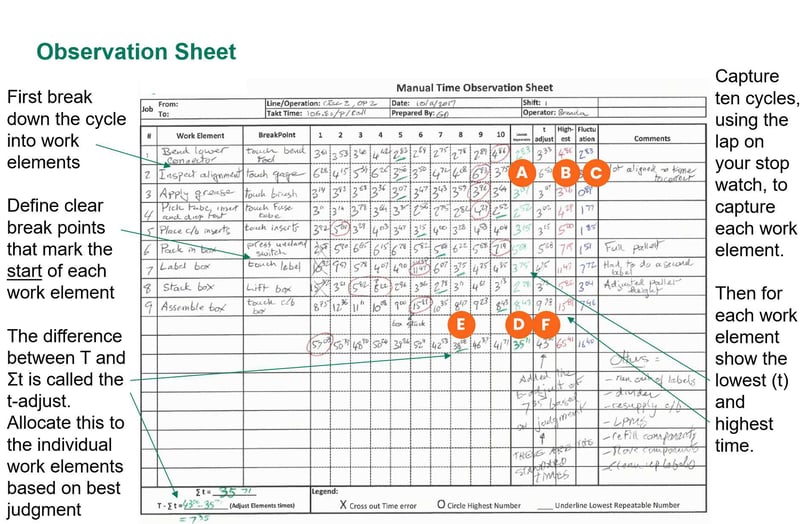
If the operator is doing purely manual work, draw the Standardized Work Chart. Arrows show the walking path for one cycle. The circled numbers correspond to the work elements. Note Takt time (Takt time = available time per day/daily demand). Standardized Work is always for a given Takt time or range of Takt times.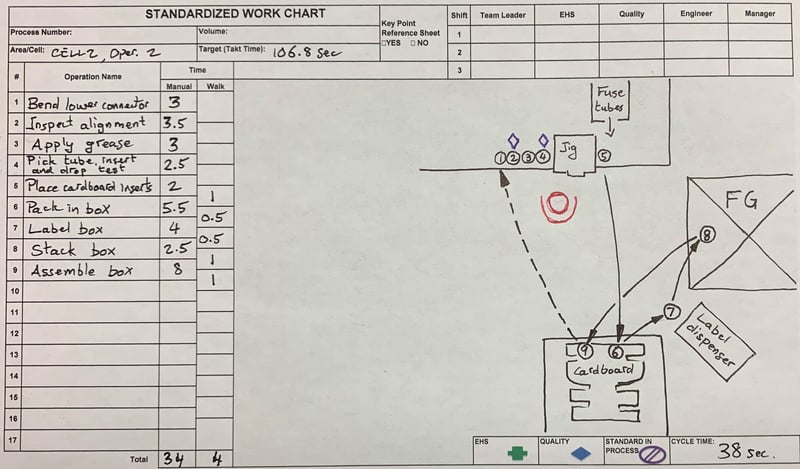
If the operator is working with machines, draw the Standard Operations Layout. Here, the cell has one operator loading parts into machines, starting the machine, picking up the unloaded part and carrying it to the next step. We indicate more information here than in a purely manual layout, which is why it has a different name (also because the timing part is on a separate sheet).
Show the location and count of standard WIP (Work In Process), and number the work elements Note: a “during switch” is a special mechanism used in lean cells…one of several modifications to make the process more efficient.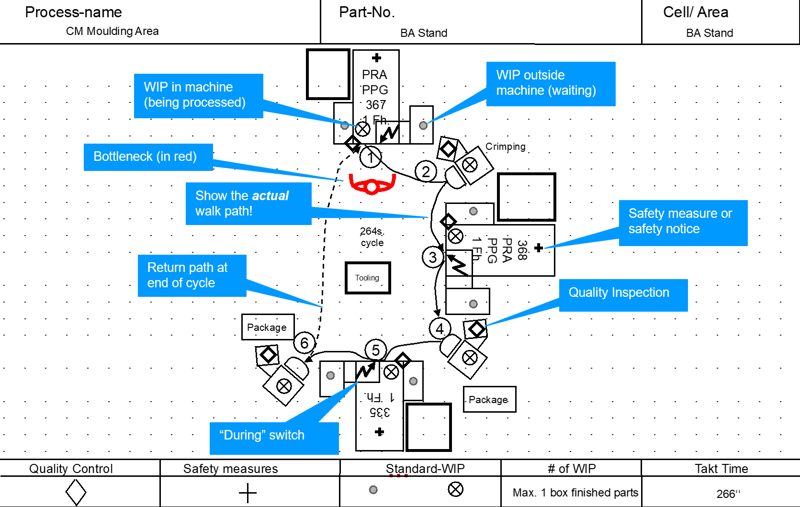
If the operator is working with machines, you also draw the Standardized Work Combination Sheet: think of it as the choreography between the operator (green lines, red lines for walking) and the machines in the cell (dotted lines). Notice how machines and people work in parallel, but within Takt time (red line on the right).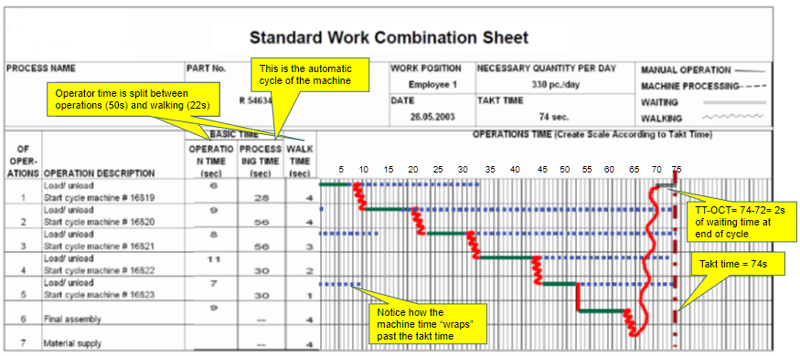
This document has three functions.
A) Provide training support for operators
B) Describe the standard for observers (e.g. during a gemba walk)
C) Document in detail the current state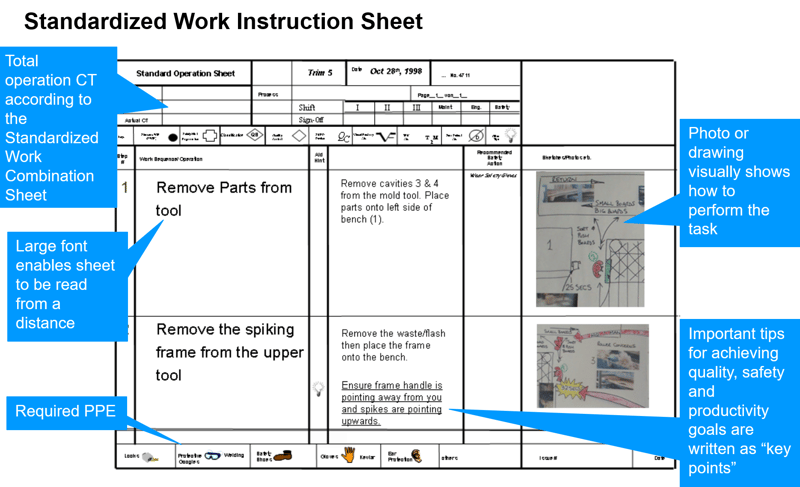
Trail the sequence to learn everything you can't see through theory.
Capture times and separate value from waste. You will fill out a sheet that is very similar to other observation sheets, but with different activity categories.
The activity categories you'll focus on here are:
A work unit is a set of activities that are done together. You should have one person per work unit, but you will have one or more work units per person.
Examples of work units include:
In the case of inspection cycles, you have stats to tell you the percentage of occurrence of the three inspection cycles and you can create standard work units for inspection in this way.
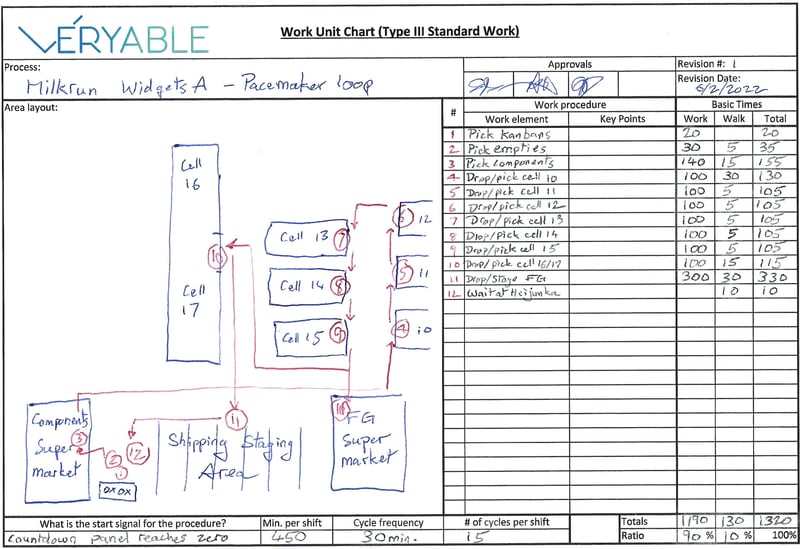
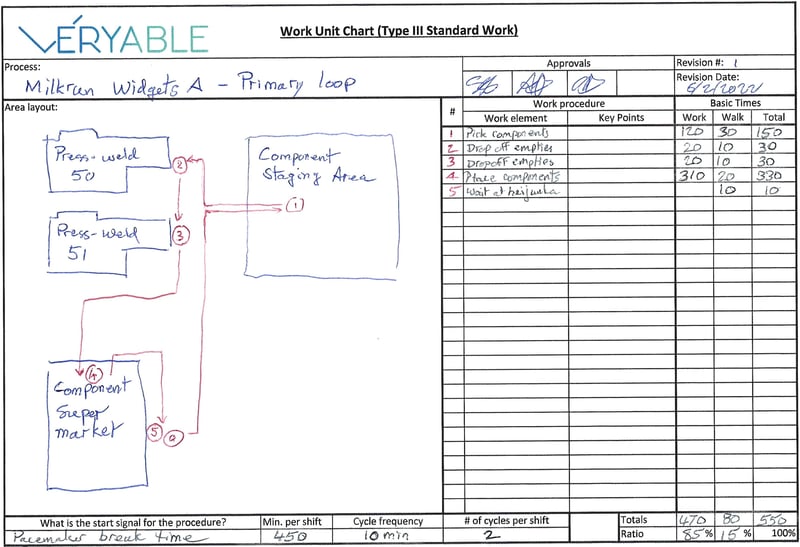
A work unit sheet is the Type III equivalent of a standardized work sheet. The difference is that there is a frequency of cycle rather than takt time.
This is the equivalent of a machine capacity sheet or takt time/cycle bar chart and is used to calculate how many people are needed to perform all the work units.
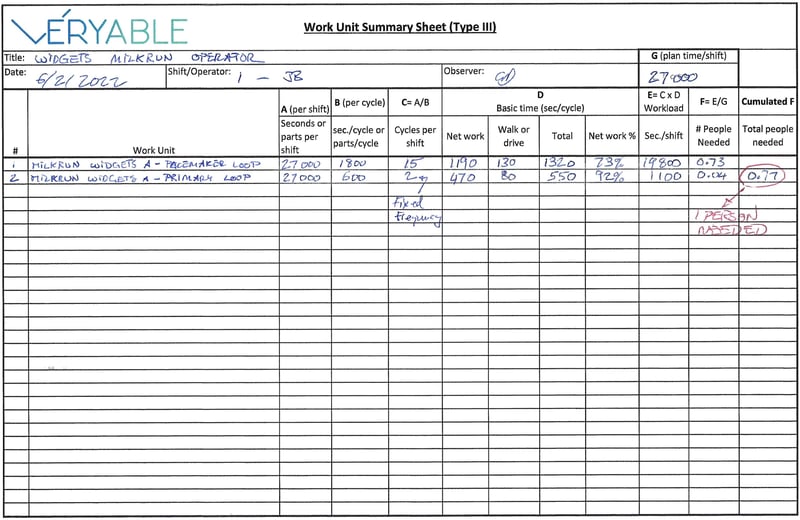
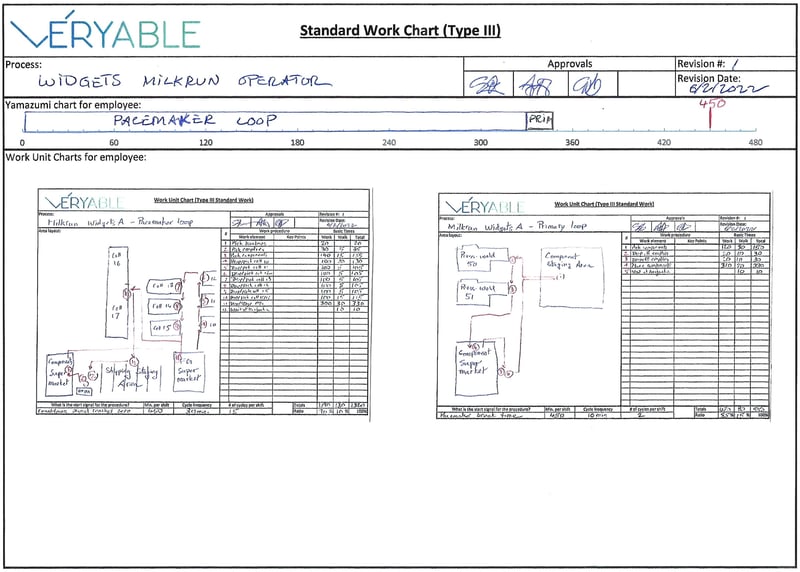
The summary standard work sheet is the final document that is posted on the shop floor. In this example, the summary sheet is for two material handlers. The first one performs two work units (red and green). The yamazumi chart shows the utilization rate (with 100% being 480 minutes per shift).
Labor will directly or indirectly impact every aspect of your operational performance. It is also one of the largest expenses on your P&L. Working to eliminate labor waste (having too much, or not enough) in real-time will allow you to move the needle both operationally and financially.
Leveraging Veryable’s On-Demand Labor Marketplace to build a labor pool will enable your team to scale labor up and down in real-time and in lock step with actual daily demand. Having this capability across all areas, all work centers, and all shifts will give your operations at least 3x greater agility. Using this when you need it, and only when you need it will help you drive out excessive overtime costs and poor service during high demand periods and lost productivity during low demand periods. Additionally, by matching headcount to demand on a daily basis, you’ll be able to maintain a lower more constant cost per unit.
In order to meet ever-changing demands, your operation needs to be agile - using spreadsheets with siloed information won’t cut it. The result of relying on “the way things have always been done” is missed deadlines and inflated costs. Workforce Management brings all your information into one place, seamlessly integrating with your Human Resource Information Systems (HRIS), Enterprise Resource Planning (ERP), and Warehouse Management Systems (WMS). These integrations allow WFM to automatically create forecasts and schedules based on actual needs in real-time as well as provide your team with the ability to seamlessly make last minute changes. WFM can act as a standalone platform for your full-time employees, or it can complement and automate many of the decisions made in using Veryable's On-Demand Labor Marketplace.
Together these systems truly optimize every labor dollar spent across your footprint. This enables better visibility to translate best practices, and can act as a roadmap for continuous improvement.
For more information, visit our Lean Center of Excellence Homepage or our homepage for Continuous Improvement, Operational Excellence, and Lean Professionals.
